Setting up a Simulated Vehicle (SITL)
The SITL (Software In The Loop) simulator allows you to create and test DroneKit-Python apps without a real vehicle (and from the comfort of your own developer desktop!).
SITL can run natively on Linux (x86 architecture only), Mac and Windows, or within a virtual machine. It can be installed on the same computer as DroneKit, or on another computer on the same network.
The sections below explain how to install and run SITL, and how to connect to DroneKit-Python and Ground Stations at the same time.
DroneKit-SITL
DroneKit-SITL is the simplest, fastest and easiest way to run SITL on Windows, Linux (x86 architecture only), or Mac OS X. It is installed from Python’s pip tool on all platforms, and works by downloading and running pre-built vehicle binaries that are appropriate for the host operating system.
This section provides an overview of how to install and use DroneKit-SITL. For more information, see the project on Github.
Note
DroneKit-SITL is still relatively experimental and there are only a few pre-built vehicles (some of which are quite old and/or unstable).
The binaries are built and tested on Windows 10, Ubuntu Linux, and Mac OS X “El Capitan”. Binaries are only available for x86 architectures. ARM builds (e.g. for RPi) are not supported.
Please report any issues on Github here.
Installation
The tool is installed (or updated) on all platforms using the command:
pip install dronekit-sitl -UI
Running SITL
To run the latest version of Copter for which we have binaries (downloading the binaries if needed), you can simply call:
dronekit-sitl copter
SITL will then start and wait for TCP connections on 127.0.0.1:5760.
You can specify a particular vehicle and version, and also parameters like the home location, the vehicle model type (e.g. “quad”), etc. For example:
dronekit-sitl plane-3.3.0 --home=-35.363261,149.165230,584,353
There are a number of other useful arguments:
dronekit-sitl -h            #List all parameters to dronekit-sitl.
dronekit-sitl copter -h     #List additional parameters for the specified vehicle (in this case "copter").
dronekit-sitl --list        #List all available vehicles.
dronekit-sitl --reset       #Delete all downloaded vehicle binaries.
dronekit-sitl ./path [args...]  #Start SITL instance at target file location.
Note
You can also use dronekit-sitl to start a SITL executable that you have built locally from source. To do this, put the file path of the target executable in the SITL_BINARY environment variable, or as the first argument when calling the tool.
Connecting to DroneKit-SITL
DroneKit-SITL waits for TCP connections on 127.0.0.1:5760. DroneKit-Python scripts running on the same
computer can connect to the simulation using the connection string as shown:
vehicle = connect('tcp:127.0.0.1:5760', wait_ready=True)
After something connects to port 5760, SITL will then wait for additional connections on port 5763
(and subsequently 5766, 5769 etc.)
Note
While you can connect to these additional ports, some users have reported problems when viewing the running examples with Mission Planner. If you need to connect a ground station and DroneKit at the same time we recommend you use MAVProxy (see Connecting an additional Ground Station).
DroneKit-SITL Python API
DroneKit-SITL exposes a Python API, which you can use to start and control simulation from within your scripts. This is particularly useful for test code and examples.
Building SITL from source
You can natively build SITL from source on Linux, Windows and Mac OS X, or from within a Vagrant Linux virtual environment.
Building from source is useful if you want to need to test the latest changes (or any use a version for which DroneKit-SITL does not have pre-built binaries). It can also be useful if you have problems getting DroneKit-SITL to work.
SITL built from source has a few differences from DroneKit-SITL:
- MAVProxy is included and started by default. You can use MAVProxy terminal to control the autopilot.
- You connect to SITL via UDP on
127.0.0.1:14550. You can use MAVProxy’soutput addcommand to add additional ports if needed. - You may need to disable arming checks and load autotest parameters to run examples.
- It is easier to add a virtual rangefinder and add a virtual gimbal for testing.
The following topics from the ArduPilot wiki explain how to set up Native SITL builds:
Connecting an additional Ground Station
You can connect a ground station to an unused port to which messages are being forwarded.
The most reliable way to add new ports is to use MAVProxy:
If you’re using SITL built from source you will already have MAVProxy running. You can add new ports in the MAVProxy console using
output add:output add 127.0.0.1:14552
If you’re using Dronekit-SITL you can:
Install MAVProxy for your system.
In a second terminal spawn an instance of MAVProxy to forward messages from TCP
127.0.0.1:5760to other UDP ports like127.0.0.1:14550and127.0.0.1:14551:mavproxy.py --master tcp:127.0.0.1:5760 --sitl 127.0.0.1:5501 --out 127.0.0.1:14550 --out 127.0.0.1:14551
Once you have available ports you can connect to a ground station using one UDP address, and DroneKit-Python using the other.
For example, first connect the script:
vehicle = connect('127.0.0.1:14550', wait_ready=True)
Then connect Mission Planner to the second UDP port:
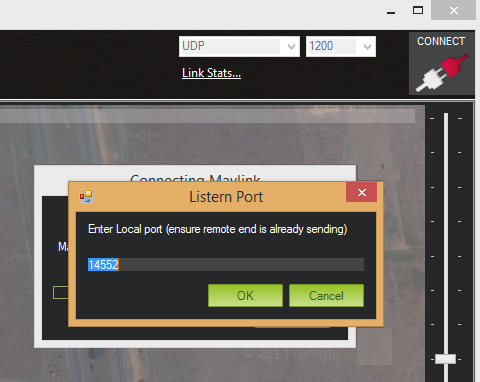
Ensure the selection list at the top right of the Mission Planner screen says UDP and then select the Connect button next to it. When prompted, enter the port number (in this case 14552).
After connecting, vehicle parameters will be loaded into Mission Planner and the vehicle is displayed on the map.
Tip
If you’re using the DroneKit-SITL Python API then you will instead have to connect to SITLs TCP port (as there is no way to set up MAVProxy in this case). So if DroneKit is connecting to TCP port 5760, you would connect your GCS to 5763.
Note that a few examples may not behave perfectly using this approach. If you need to observe them in a GCS you should run SITL externally and use MAVProxy to connect to it.
